Views
Korge’s views works like AS3’s DisplayObject or the HTML DOM. It is intended for 2D rendering, though you can create custom views with 3D content rendering with KorAG.
Rendering
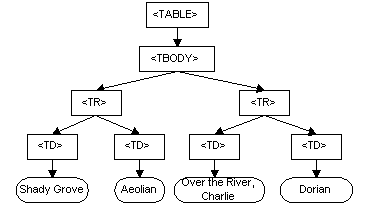
It is a tree structure where View has a parent, and Container has other View as children.
Then when KorAG performs the rendering, it starts drawing from the bottom to the top. Just like Painter’s Algorithm.
Properties
Basic Properties
- x, y
- scaleX, scaleY
- rotation: Angle
- skewX, skewY
- visible
- alpha
- blendingMode
- speed: Float – controls the view’s updating speed (being a ratio where 1 is 1x, 0.5 is 0.5x and 2 is 2x the speed)
- colorMul: RGBA
- zIndex: adjusts the order of the views inside their container
Computed Properties
- globalX, globalY
- globalMatrix
Blending Modes
KorGE supports NORMAL, ADD, MULTIPLY and SUBTRACT blending modes.
Components
Each view might have components attached. Each component is attached to a View.
interface Component {
    val view: View
}
fun <T : Component> T.attach() = this.apply { this.view.addComponent(this) }
fun <T : Component> T.detach() = this.apply { this.view.removeComponent(this) }
And there are several kind of Components that can hook View’s behaviour. You can create components that implement several Component interfaces:
Handling Updating
interface UpdateComponentWithViews : Component {
    fun update(views: Views, ms: Double)
}

interface UpdateComponent : Component {
    fun update(ms: Double)
}
Handling Resizing
interface ResizeComponent : Component {
    fun resized(views: Views, width: Int, height: Int)
}
Handling Events
interface EventComponent : Component {
    fun onEvent(event: Event)
}
Handling Input Events
interface TouchComponent : Component {
    fun onTouchEvent(views: Views, e: TouchEvent)
}

interface MouseComponent : Component {
    fun onMouseEvent(views: Views, event: MouseEvent)
}

interface KeyComponent : Component {
    fun onKeyEvent(views: Views, event: KeyEvent)
}

interface GamepadComponent : Component {
    fun onGamepadEvent(views: Views, event: GamePadButtonEvent)
    fun onGamepadEvent(views: Views, event: GamePadStickEvent)
    fun onGamepadEvent(views: Views, event: GamePadConnectionEvent)
}
The lifecycle of that component is associated to the View. So when the View and the Component are no longer referenced, they will be collected by the GC.
For example, a Component that would reposition views when the viewport is rezied would be like this:
fun <T : View> T.dockedTo(anchor: Anchor) = DockingComponent(this, anchor).attach()

class DockingComponent(override val view: View, var anchor: Anchor) : ResizeComponent {
	override fun resized(views: Views, width: Int, height: Int) {
		view.x = views.actualVirtualLeft.toDouble() + (views.actualVirtualWidth) * anchor.sx
		view.y = views.actualVirtualTop.toDouble() + (views.actualVirtualHeight) * anchor.sy
		view.invalidate()
		view.parent?.invalidate()
	}
}
Taking a screenshot
Sometimes you will want to take a screenshot, or save a View in a Bitmap, or render the view in a Bitmap. To do so, you can use the View.renderToBitmap(views) method.
To save the whole screen:
val bitmap: Bitmap32 = stage.renderToBitmap(stange.views)
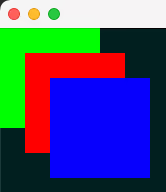
Sorting/reordering views inside their container
You can control the order in what the views are being displayed by creation order. Firstly created views are displayed in the back, while newly created views are displayed in the front.
It is possible to readjust view order with the zIndex property. It is a float that serves as a score for sorting the views.
By default, all views have a zIndex of 0f. Negative values go to the back, and positive values to the front relative to the views that have a zIndex of 0f.
It is important to note that the zIndex is not global, but local to the parent container of the view.
So if you need to sort several views, they must have a common parent to use the zIndex property.
To illustrate this:
val boxGreen = solidRect(Size(100, 100), Colors.GREEN).xy(0, 0)
val boxRed   = solidRect(Size(100, 100), Colors.RED  ).xy(25, 25)
val boxBlue  = solidRect(Size(100, 100), Colors.BLUE ).xy(50, 50)
And after setting their zIndex:
boxGreen.zIndex = +1f
boxBlue.zIndex = -1f
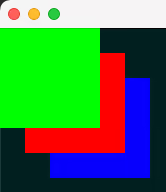
Now the green is in the top, while the blue is in the back. boxRed is in the middle since it has a zIndex of 0f.